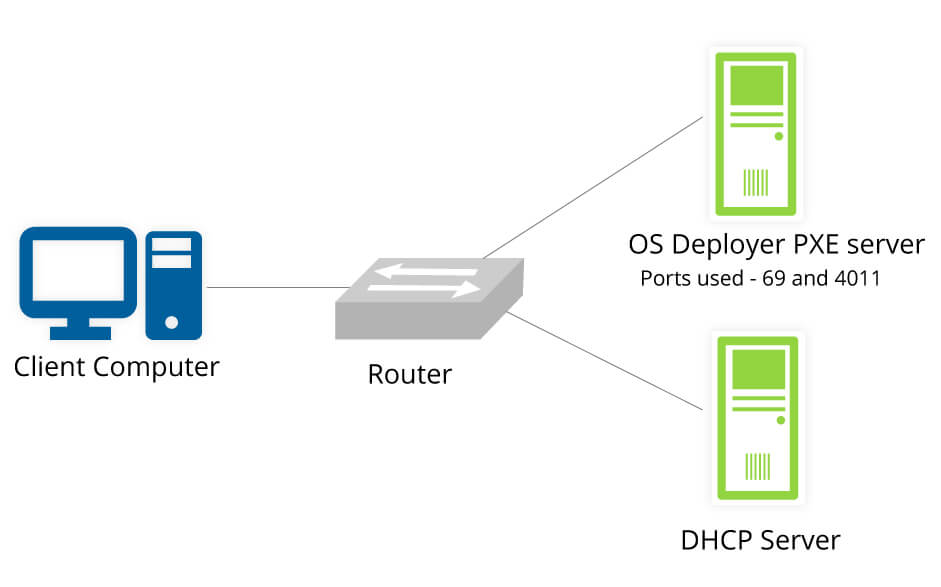
Hello everybody, we will learn how we can install debian, ubuntu or other linux over network. this is call Preboot execution environment (PXE), pronounced pixie, is a set of standards that enables a computer to load an operating system (OS) over a network. for this tutoriel we will learn how we can install ubuntu 22.04 over pxe.
To start our tutoriel we will begin with new ubuntu server installation. to understand all ther step we will start with simple plan. We need to install DHCP, TFTP and HTTP server. You can install all servers on the same machine.

Configure DHCP Server
If already have dhcp server add configuration for PXE on your conf and skip this step.
joel@installer:~$ sudo apt install isc-dhcp-serverAfter you dhcp server is installed you can change some configuration files.
Change variable value INTERFACESv4 on the file /etc/default/isc-dhcp-server to put interface who is connected with client network for PXE. This Interface need to be up and already have static ip. If there is not the restart of service isc-dhcp-server going to fail.
joel@installer:~$ grep INTERFACESv4 /etc/default/isc-dhcp-server
INTERFACESv4="enp0s9"
Put this value on file /etc/dhcp/dhcpd.conf and restart service.
joel@ubuntu:~$ cat /etc/dhcp/dhcpd.conf
subnet 192.168.57.0 netmask 255.255.255.0 {
  default-lease-time 600;
  max-lease-time 7200;
  allow booting;
  allow bootp;
  next-server 192.168.57.254;
  option tftp-server-address 192.168.57.254;
  range 192.168.57.10 192.168.57.100;
  option domain-name-servers 192.168.57.254, 8.8.8.8;
  option domain-name "test.lan";
  filename "boot/bios/pxelinux.0"; # for EFI use "boot/uefi/syslinux.efi"
# deny unknown-clients;
#  host newpc {
#  hardware ethernet 08:00:27:46:EC:7C;
# }
}
joel@ubuntu:~$ sudo systemctl restart isc-dhcp-server && sudo systemctl status isc-dhcp-server
● isc-dhcp-server.service - ISC DHCP IPv4 server
     Loaded: loaded (/lib/systemd/system/isc-dhcp-server.service; enabled; vendor preset: enabled)
     Active: active (running) since Fri 2022-07-15 07:20:12 UTC; 27ms ago
       Docs: man:dhcpd(8)
   Main PID: 1606 (dhcpd)
      Tasks: 4 (limit: 1034)
     Memory: 4.5M
        CPU: 8ms
     CGroup: /system.slice/isc-dhcp-server.service
             └─1606 dhcpd -user dhcpd -group dhcpd -f -4 -pf /run/dhcp-server/dhcpd.pid -cf /etc/dhcp/dhcpd.conf enp0s9
Change 192.168.57.254 with ip of your TFTP server. If you want that dhcp server make response just for register client. Example you have pxe server on your network and you want that juste selected machine can be install. uncomment ligne »# deny unknown-clients; » and « host newpc … » bloc. you need to have one host bloc per machine that you want to install and specified uniq name and mac adresse of client (harware ethernet xx:xx…)
Configure TFTP(Trivial File Transfer Protocol) Server
Now we will Install tftp server package (tftpd-hpa), we don’t need to change default configuration. just listen that by default directory « /srv/tftp » will use to fetch tftp file.
joel@ubuntu:~$ sudo apt -y install tftpd-hpa
joel@ubuntu:~$ cat /etc/default/tftpd-hpa
# /etc/default/tftpd-hpa

TFTP_USERNAME="tftp"
TFTP_DIRECTORY="/srv/tftp"
TFTP_ADDRESS=":69"
TFTP_OPTIONS="--secure"

joel@ubuntu:~$ sudo systemctl status tftpd-hpa
● tftpd-hpa.service - LSB: HPA's tftp server
     Loaded: loaded (/etc/init.d/tftpd-hpa; generated)
     Active: active (running) since Fri 2022-07-15 11:52:28 UTC; 4min 15s ago
       Docs: man:systemd-sysv-generator(8)
    Process: 2688 ExecStart=/etc/init.d/tftpd-hpa start (code=exited, status=0/SUCCESS)
      Tasks: 1 (limit: 1034)
     Memory: 452.0K
        CPU: 8ms
     CGroup: /system.slice/tftpd-hpa.service
             └─2696 /usr/sbin/in.tftpd --listen --user tftp --address :69 --secure /srv/tftp

Jul 15 11:52:28 ubuntu systemd[1]: Starting LSB: HPA's tftp server...
Jul 15 11:52:28 ubuntu tftpd-hpa[2688]:  * Starting HPA's tftpd in.tftpd
Jul 15 11:52:28 ubuntu tftpd-hpa[2688]:    ...done.
Jul 15 11:52:28 ubuntu systemd[1]: Started LSB: HPA's tftp server.
For testing you tftp server you need to install create file on tftp directory. Don’t forget to give good right to tftp user on file.
root@ubuntu:/home/joel# echo "bonjour" > /srv/tftp/test.txt
root@ubuntu:/home/joel# chown tftp:tftp /srv/tftp/test.txt
Install tftp client on an other machine on same network and try to download this file. replace 192.168.56.103 with your tftp server ip.
joel@test:~$ sudo apt install tftp-hpa
joel@installer:~$ tftp 192.168.56.103
tftp> verbose
Verbose mode on.
tftp> get test.txt
getting from 192.168.56.103:test.txt to test.txt [netascii]
Received 9 bytes in 0.1 seconds [1228 bit/s]
Configure HTTP server
Now we will install and configure apache server to publish directory « /srv/tftp » for everyone without authentication.
joel@ubuntu:~$ sudo apt -y install apache2
joel@ubuntu:~$ cat /etc/apache2/conf-available/tftp.conf
<Directory /srv/tftp>
        Options +FollowSymLinks +Indexes
        Require all granted
</Directory>
Alias /tftp /srv/tftp

joel@ubuntu:~$ sudo a2enconf tftp
Enabling conf tftp.
To activate the new configuration, you need to run:
  systemctl reload apache2

joel@ubuntu:~$ sudo systemctl restart apache2 && systemctl status apache2
● apache2.service - The Apache HTTP Server
     Loaded: loaded (/lib/systemd/system/apache2.service; enabled; vendor preset: enabled)
     Active: active (running) since Fri 2022-07-15 12:04:39 UTC; 12ms ago
       Docs: https://httpd.apache.org/docs/2.4/
    Process: 3777 ExecStart=/usr/sbin/apachectl start (code=exited, status=0/SUCCESS)
   Main PID: 3781 (apache2)
      Tasks: 4 (limit: 1034)
     Memory: 2.5M
        CPU: 27ms
     CGroup: /system.slice/apache2.service
             ├─3781 /usr/sbin/apache2 -k start
             ├─3784 /usr/sbin/apache2 -k start
             └─3785 /usr/sbin/apache2 -k start
after install, configure and restart service, you can now have access to tftp directory « /srv/tftp » over this url http://192.168.56.103/tftp/ , please try to download your last test file, if it’s not possible please resolve this step to go on next step.
If all the last step working fine. you can go to next level.
Create PXE file for boot
for this step we will begin by download iso of linux os in the tftp directory.
joel@ubuntu:~$ sudo su
[sudo] password for joel:
root@ubuntu:/home/joel# cd /srv/tftp/
root@ubuntu:/srv/tftp# wget https://releases.ubuntu.com/22.04/ubuntu-22.04-desktop-amd64.iso
root@ubuntu:~# ls /srv/tftp/
test.txt  ubuntu-22.04-desktop-amd64.iso
root@ubuntu:/srv/tftp# mount ubuntu-22.04-desktop-amd64.iso /mnt/
mount: /mnt: WARNING: source write-protected, mounted read-only.
root@ubuntu:/srv/tftp# mkdir -p init /srv/tftp/boot/uefi /srv/tftp/boot/bios /srv/tftp/pxelinux.cfg
root@ubuntu:~# cp -p /mnt/casper/initrd /srv/tftp/init
root@ubuntu:~# cp -p /mnt/casper/vmlinuz /srv/tftp/init
root@ubuntu:~# apt install syslinux-common syslinux-efi pxelinux
root@ubuntu:~# cd /srv/tftp
root@ubuntu:/srv/tftp# cp -p /usr/lib/PXELINUX/pxelinux.0 boot/bios
root@ubuntu:/srv/tftp# cp -p /usr/lib/syslinux/modules/bios/ldlinux.c32 boot/bios
root@ubuntu:/srv/tftp# cp -p /usr/lib/syslinux/modules/bios/libcom32.c32 boot/bios
root@ubuntu:/srv/tftp# cp -p /usr/lib/syslinux/modules/bios/libutil.c32 boot/bios
root@ubuntu:/srv/tftp# cp -p /usr/lib/syslinux/modules/bios/vesamenu.c32 boot/bios
root@ubuntu:/srv/tftp# cp -p /usr/lib/SYSLINUX.EFI/efi64/syslinux.efi /srv/tftp/boot/uefi
root@ubuntu:/srv/tftp# cp -p /usr/lib/syslinux/modules/efi64/ldlinux.e64 /srv/tftp/boot/uefi
root@ubuntu:/srv/tftp# cp -p /usr/lib/syslinux/modules/efi64/libcom32.c32 /srv/tftp/boot/uefi
root@ubuntu:/srv/tftp# cp -p /usr/lib/syslinux/modules/efi64/libutil.c32 /srv/tftp/boot/uefi
root@ubuntu:/srv/tftp# cp -p /usr/lib/syslinux/modules/efi64/vesamenu.c32 /srv/tftp/boot/uefi
root@ubuntu:/srv/tftp# ln -s ../../pxelinux.cfg boot/uefi/pxelinux.cfg
root@ubuntu:/srv/tftp# ln -s ../../pxelinux.cfg boot/bios/pxelinux.cfg
root@ubuntu:/srv/tftp# cat /srv/tftp/pxelinux.cfg/default
 DEFAULT vesamenu.c32
 PROMPT 0
 NOESCAPE 1

 MENU TITLE PXE System Installation

 LABEL Ubuntu 22.04
   MENU LABEL ubuntu_22.04
   KERNEL ../../init/vmlinuz
   INITRD ../../init/initrd
   APPEND root=/dev/ram0 ramdisk_size=1500000 ip=dhcp url=http://192.168.56.103/tftp/ubuntu-22.04-desktop-amd64.iso

root@ubuntu:~# chown -R tftp:tftp /srv/tftp/
replace 192.168.56.103 with ip of you http server. Don’t forget that you need to have ram big more than your file size. Now Reboot your client pc and start install. you can press enter on this page.

Laisser un commentaire